
Who's ready to record December memories?
I adore scrapbooking Christmas and all the days leading up to it! It's probably my most favourite scrapbooking activity of the whole year!
Every time the Christmas decorations are unpacked - so are my December albums.
We put them on the coffee table and in a basket nearby. There is no other Christmas pleasure as much as what I get out of watching family and friends relive those wonderful memories of Christmases past with an 'Remember that!' and 'Ooooh look at us!'
Primarily I'm using a Tim Holtz large Worn Cover (9"x 6 1/2" with refills (8x6)
with its matching plastic inserts and binder rings.
Here's my cover and today, I'm showing you what I'll be working with.....

Lee-Anne has made up a kit of these at an amazingly great price and I believe there is only two left!
So grab one and play along with me! Click HERE to buy one....

If you miss out, then Lee-Anne has other alternatives in a pocket page format up her sleeve!!!
So watch this space!
Now, on we go.....
Another quick solution to getting a December Album done...
is pick a Paper Collection Kit- click HERE
to see the ranges and as you scroll down you will notice different
Christmas kits interspersed with various other kits....and the great thing is there are various prices that might suit your budget so look through them carefully - there are some great bargains there!
I've chosen MME Sleighbells Ring as I love the colours & patterns- it just appealed
These are also available!

And if you love these... there are some gorgeous embellishments that will work perfectly...
I grabbed these matching Decorative Tags and see the black one...weeeeell, that fit PERFECTLY (by accident) in the circle frame on the front of the album! Imagine that!! Without even trying!


I'll definitely be including the other tags throughout the pages too.
(I've put dimensional magic on the vines and around the wreath on the round tag and the word banner 'Noel'
The number '25' Enamel Shapes is also from the Sleighbells Ring range and for sure the rest will come in handy too!

And did you notice the fabulous ivy vine diecut 'Mega Holly Flourish' on the front of the album? It is one of the more expensive dies, buuuuut... I've used it over and over, I've dimensional magic-ed it, I've pulled it apart and used bits of it, I've used all kinds of paper and colours too on so many projects. Its one of those general 'go-to' Christmas dies!
So after a while... its worth it! Its about 18cms long - fabulous!

Still to be used are these fabulous little Treat Bags

And the Sleighbells Ring washi tape is stunning! It comes in a pack and I've taken a proper good look pic below, seeing it out like that does it more justice doesn't it!


Hmmmn, other things I might use are....
sequins! Pop 'sequins' in the search bar in the shop and look at all the pretty colours that pop up!
Most are artist's drawings of them in packets (have no idea why manufacturers do that!) - but believe me - in real life they are sparkly and gorgeous!
Oh and these.... Teresa Collins Tinsel & Company overlays
(hard to see them from the manufacturer's photo in the shop (the black & white photo behind is off putting!)... but they make amazing shaker pockets (with the sequins!!!!) Here's a quick pic of them spilled out on my desk. Hmmmn, does that help?

Some other helpful things you might want to gather if you'd like to learn some new techniques or try out products you might not have known about along the way is
A Christmas dinner napkin (because you love the pattern!)
Dimensional Magic (or the like)
A stencil (I used Theresa Collins Essential one, it has 3 A4 sized stencils in the packet)
And I LOVE Ranger's Coredinations Distress Cardstock - it really is such amazing quality. There are some great colours there that work well with the paper collection you might choose.
Inka Gold Graphite is like a metallic finish that can be rubbed onto just about anything. Its great to use as a distress colour on the album covers too!
It doesn't have to be the same as these are ideas, just gather up your supplies!
There might be other bits and pieces...
COVERS (inside and out)
Not a lot of work needs to be done for these covers as they are pretty much done for us!
The vine looks fabulous with some Dimensional Magic on it - it comes into its own as an embellishment (the photo shows it in its not quite dry form. There is one dry layer, and then I've put on a second layer...just on once side of each leaf to give it more of a 3-D effect

which I pulled apart to make it go further for underneath the tag

Then the tag goes on top to finish it off
the little letter 'DAYS' can be found HERE
It also got a good dose of Dimensional Magic too!

-------------------------------------------------------------
Inside Cover:
Have you found a pretty Christmas Napkin...
as this can go along the entire length of the inside cover.. (or any album you choose)
Here's a part of it as an overview...
you can also notice the Dimensional Magic raising up in places

Usually napkins are two ply, so pull the bottom layer away from the top patterned layer.

Then with a wet brush, paint with water along where you'd like to tear your napkin


So here is where it will be placed... right along the bottom of the inside cover.
If you look closely, you'll see a join... but that will become in visible

The fun part! Using a Matte Gel (or you can use a gloss one that looks just as fabulous) we'll adhere the napkin piece to the cover...

Paint underneath where the napkin will go with the matte gel...

then on top of the napkin to seal it :)

and here it is right along the inside cover
(and the darker grey inking is already there- its the way the cover comes)

Next is the stencilling of the word 'REMEMBER'

A stencil (I used Theresa Collins Essential 'Remember' one, it has three A4 sized stencils in the packet) now that's cool! Here's a photo of them out on my desk so you can see them easier than in the manufacturer's packaging.

I had a little practice with on a spare piece of paper before I did it for real on my album...
Got to say it worked a treat.... The tub is 'Inka Gold - Graphite' (I think I have every colour in Inka Gold because I love it so much!!) I've used the Ranger Wooden Ink Blending Tool which worked great blending in the Inka Gold
(don't be fooled by the 'Gold' bit - its just a name, not a colour - don't know why?)

I did rub this in a second time to get it to go a little darker.
The Inka Gold dries quite fast and suggest you keep the lid on your tub.

Then rubbed the Inka Gold Graphite around the edges of my inside cover, added dimensional magic over the word 'Remember' and that really raised it up a treat too. And added in the bar with the rings on too. Some sequins top it off! Pop the word 'sequins' in the search bar in the shop and see all kinds of colours!

------------------------------------------------------------


 ----------------------------------------------
DAY 2


Gotta love a transparency page and a bit of sequin!
First up is the transparency shaker page..
I'm using the reverse side of this front paper in the MME Sleighbells Ring kit
and picked out two 7x5 sized transparency from
Theresa Collins Photo Overlays (there are 6x4s too)

And folded the paper in half, measured and cut a frame
Put a heap of sequins on top of one of the overlays
glue the edges of the other overlay and stick it down on the other
All colour matched with the napkin that had been pasted and sealed inside the cover
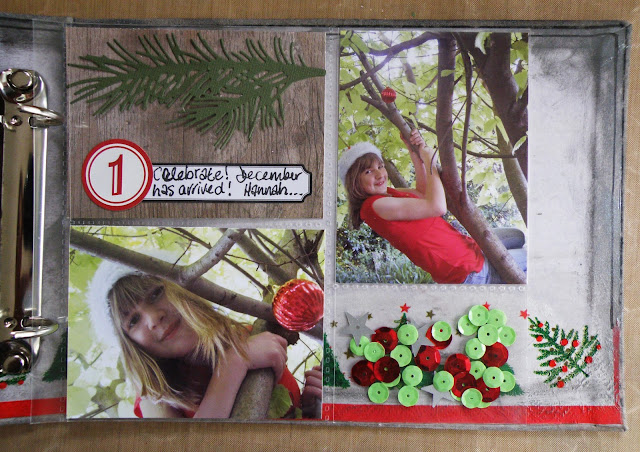
Next is Day 1
These different sizes and orientations come with the covers and I've used
the bottom left one
First is a little sequin pocket on the lower right side
It can be sealed in a number of ways :- fuse tool, vellum tape, sewn, bit of glue
And using some leftover of the woodgrain paper as a little title block
This little Pine Die is fabulous - another die that I use heaps

Which worked a treat...
along with this Teresa Collins Label Stickers
Amazing what a little bit of sparkle brings to the page :)
DAY 2
and I've used the reverse side of the pocket page and the little sequin shaker will be just as wonderful on this side of the page as it was on Day 1 (big smile)

Here are the products used:
The washi is from a pack of four, and it doesn't disappoint!
You can find it HERE

(they come with six pages!! And plenty of E's in the alphas!! And only $1.50!)
They work fabulously together. Alpha's come in black too (gonna order more of those!)

And loving the puffy Sleighbells Ring stickers!

---------------------------------------------------
DAY 3
is a treat bag turned into a pocket of tags with photos on the front...

I think I'll use another one of these bags again in this album for sure
They are 'Sleigh Bells Ring' found HERE

And folding down the top of the bag - the white on the reverse side looked stark and unappealing so thought I'd cut out a couple of small strips to fit both top and bottom edges of the bag... at first I thought I'd like to use the black tartan on the lower side, and the gingham on the top... but.....

(this paper is found in the 'Sleigh Bells Ring' Kit)

I didn't like the tartan and the gingham much, so two edges of the gingham looked so much better!

The stickers in this sheet are wonderful!
It will either come in the 'kit' if you buy it... or you can just buy the stickers by themselves

Now the bag is done, time for the tags..
you can find the little tags HERE

Remember we used one of the black round tags on the front cover
And like everything, used Tim Holtz Black Soot Ink to edge and distress everything

Pop on the photos, some puffy stickers and alpha
And some sweet black and white twine to finish off the tags

the reverse sides


--------------------------------------------------------
DAY 4
The reverse side of the treat bag,
Its great to catch your pets a little bit festive if you can,
although you can tell by 'Cosmo's' face - he is not happy with the hat-thing!

This is another design of the washi tape collection from Sleigh Bell's Ring
Another puffy sticker and little alpha

Here's the treat bag set into the album with the other completed pages behind

----------------------------------------------------------
DAY 5


----------------------------------------------

-------------------------------------------------------------


Using one of the lovely MME Sleighbells Ring papers, I made up a pocket page with it
I really LOVE this paper! You can either get it in the KIT or by the single paper called

This is one piece of paper, cut in half. I measured it against the plastic pocket page in the album to get the right size. Normally I would have folded the paper over, but because of the print, if you fold, the other side of the pocket page would be upside down. So cut two which included the manufacturers strip down the bottom (otherwise it would have been too short)

BUT, the lovely washi tape covers that!
You can find the set of Sleighbells Washi Tape HERE


Then made an insert - this cardstock matched beautifully(and I love the texture and quality!)
Ranger Distress Cardstock - Forest Moss (it looks much greener in real life than manufacturers pic)
And another design of the Sleighbells washi range too.
The corner rounder tool can be found HERE

There were a few photos of Paige's little school concert, so put them together on the insert, which included a flip up as well. Sitting so far away from the stage, these pics were never going to be good shots... but none the less, still memories.


Another design of the Sleighbells Ring washi tape - a fave!!

----------------------------------------------
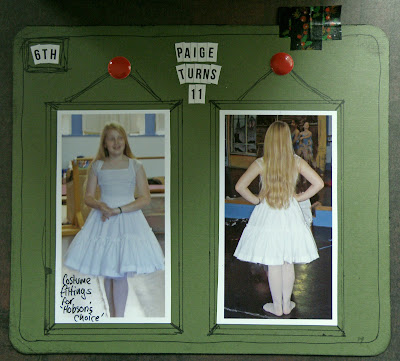
DAY 6
The other side of the insert....
Sometimes pages can be simple and you don't need to be an artist to draw a half ruled, half freehand frame like a picture hanging on a wall...
I've used this little Teresa Collins Alpha all the way through this album so far - it works really well.
and some Sleighbells Ring Enamel dots. Kind of replicates Rudoph's nose!

---------------------------------------------
DAY 7
The outside of the pocket page again,
this time I've used those dots on the red dots of the paper...which accidently made a cool effect!

---------------------------
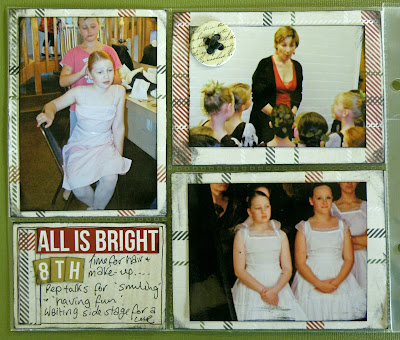
DAY 8
Two of the different orientations of the Tim Holtz pocket pages that go with the album

Both sides of the paper Sleighbells Ring 'Blitzen' are used under the photo and for journaling upon- which is also in the kit. I haven't used the deer image at all as its too big for the pages of this album, but both the soft coloured woodgrain and the gorgeous light tartan on the other side are a treat....

The strip orientation of a couple of the pages in the Tim Holtz inserts are perfect for that title,
or even a sequin/sparkle shaker if you seal them!

The wording and alpha on both pages below this time are from Teresa Collins Tinsel & Co
The little word printed button is MME All is Bright

The gorgeous music chevron is also from the collection of MME All is Bright

-------------------------
Day 9
Trimming the tree....
It's another 'paper pocket page' I really loved how the last one turned out and the fact that cardstock inserts can be made to fit in them as well ... so here we are....

Here's a photo of the last pocket page (I used it to measure by)
This time I just folded over the 12x12" paper MME Sleighbells Ring 'Christmas Confetti'
as no 'upside down' on the other side -writing like the green paper, will happen this time.
You can see that the manufacturers strip is there (its a fabulous blod black and white chevron is on the inside) Weeeell, I use this :)

This is on the inside but know one will see it.....

Because I cut it out and left only a little bit on the lefthand side.
It looks more like a file now. I've used the same Sleighbells Ring washi tape again
because its quite wide and it covers both sides of the paper generously.


Then make an insert... I've used the beautifully textured Tim Holz Core'dinations Distress Cardstock in 'Black Soot'.

See how it sits nicely into the pocket...just like a file :)

Have you seen these? Not very attractive in its manufacturers packaging,
but boy they are fabulous in real life. Each frame is of high quality chipboard.

And really want to use these ones except need to cut the bottoms off them....

Except.. oopsies on the black frame... didnt need to cut that.. but this lovely washi (part of the Sleighbells Ring set) worked a treat covering the mistake up

And have you seen these... Sleighbells Ring Alpha and Word Stickers
Truly.. when you see them in the shop just in the packet - you'd swear there is only the red one as its in front.(and unless you go into the details page and read the fine print.. you'd be none the wiser)
Anyway....open the packet in real life.. and look what pops out! BONUS! Eight sheets!
Weeeell, I got handy with these....

----------------------------------------------------------------
Now with
DAY 10
being added
Day 9 and 10 have Sleighbells Ring Enamel Shapes too.
Here's the insert that will go in the pocket...


And this is how it looks pushed all the way in.... just like a file :)

And.. MME 'Joyous' collection have a great alpha/word sticker set too!
Again, with just the green sticker sheet at the front, you don't realise these others sheets are sitting behind. Cool hey!

DAY 11
This is where I used the above alphas and words. I try to keep any sort of insert scrapping flat so that nothing gets caught when its taken out or put back in.... just for ease of movement.

DAY 12
This is the back of the pocket page. I loved this little Christmas sign from
and hung it like a little sign pegged up with an enamel dot

I don't know whether you can see this or not, but the twine ( has a little fine wire in it and little sequins attached. Love this and will use it more... Deco Wrap Red with Gold Sequins

There we are... the insert just leaning out of the pocket

----------------------------------------------------------------
DAY 13
Did lose a lot of light here for photos ... nevertheless, its still visable! (grimace!)
Poor Cosmo, anyone would think he is hard doneby! I loved the words from the Joyous stickers...
one said 'hohoho' which I'm sure Cosmo is saying sarcastically! And the other was 'Just a simple wish' ... from me... 'just smile Cosmo, its just a bit of plastic ivy!'
But as you can see.... 'Not happy Jan'!
For a cat, he was one of the most expressive I've ever had (and the most vocal!)

The little tags are from MME Mistletow Magic Decorative Brads
They come just like that (except I've added the date with these Teresa Collins Alphas) and very carefully placed the paper tag part inside the plastic pocket, and the brads pushed through (with help of craft knife) from the front of the pocket - these alleviates the pockets puckering. And its also 'see-through' - that's always appealing :)

-----------------------------------------------------------
DAY 15
A transparency!


The washi tape on the window above is part of the washi collection of Sleighbells Ring
(its the top one in the tube below)

(its the top one in the tube below)

Dont be fooled by the 'blue' background! Why do manufacturers do this kind of thing!??
There is nothing blue about this overlay AT all! It's CLEAR!
Its a 12x12 and only $2.95!
You might notice there is no tree on my page as I've cut it down to measure with
the Tim Holtz 'Worn Cover' and the tree was too tall - so ended up using that part for another project!
Yes you can cut these things apart - sometimes its cheaper than embellishments!!
LoVE pompom trim! Although there isn't any yellow in the shop..there is green!
(I shall be getting some of that in my next order!) And there is a bigger pink one here
And have you ever put the word 'trim' in the search bar... oooh!
Anyway... back to the transparency page ......

The little green window is my kitchen window, and I wanted to see the photo on either side of the transparency page so printed it out on 'ink jet' friendly transparency. I got mine from an office supply shop. Inkjet printer ink doesn't set on ordinary plastics. Its an idea if you want to play with it :)
The photo actually looks washed out here in the pics, but in real life its quite vibrant. The camera just doesn't pick it up well.

I stitched along the edge to keep it in place and here's the pompom poking out
(though it could be glued)
(though it could be glued)

and when the album is closed

---------------------------------------------------------------
DAY 16, 17 & 18
I've put these three days together as they share the one pocket page with the
16th being the front of the little Sleighbells Ring Treat Bag
17th an insert and
18th the reverse side of the insert.
Everything has been inked with Tim Holtz 'Black Soot' Distress Ink

My most favourite cardstock to use is Tim Holtz Coredinations Distress Cardstock because its so thick and strong and has a really heavy weave on it. Great for making pages!
Here I've used Fired Brick and Black Soot.
I've glued them together making red this side and black the other.

Ooops, looks like this die has sold out in the shop,

The Wish List!
These are just hand made with little number stamps from long ago
The 'to be completed' label is one of many blank label stickers found in a booklet style
The gold clip is hand made... just an oversized gold paper clip, glue gun and a button!

The reverse side of the insert...
(hmmn, need to cover the back part of the clip!!)
Love these little black Teresa Collins alpha stickers!

All done and tucked away!

--------------------------------------------------------------
DAY 19
The black cardstock(reverse) side of the envelope page
Trying to make light of a mood.... (smily face)

These little antlers can be found in MME Sleighbells Ring Enamel Shapes

(as does the red dot for Hannah's nose!)
So thought I'd have some fun with this and snipped of the joining piece down the bottom of the antlers and then stuck them either side of Hannah's head!

LOL, it sure does bring a giggle now!!

------------------------------------------------------------
Day 20
It's always great to try and capture some of your favourite decorations.
Some change over the years, some stay.

Two of my favourite papers are in the MME Sleighbells Ring Kit
(or the 'Noel' (red) paper can be found here as single sheet)

And is full of fabulous words that can easily be made into
embellishments or journaling cards etc.
I found the word 'Falalala' just the most perfect size for the strip pocket!

The page inserts for this Tim Holtz album are just amazing with a couple of the designs showing these 'strips' which are great for titles or shaker pockets or even using washi tape!
Just had to add a little black cardstock to the ends of the word so it would fit the strip pocket okay.

Some of the other words (Sleigh Bells) fit the other two spots....

And here is the whole lot of pages from just this post....closed and piled up on each other.

--------------------------------------------------
DAY 21
This is the reverse to day 20, and the long strip down the middle became a shaker using quite large gold sequins (put a 'sequins' in a search in the shop and look at all the options- some lovelies there)

The paper used for this is the reverse side used for day 20 as well
Sleighbells Ring 'Noel' paper (also found in the Sleighbells Ring Kit)

And cut to size to fit the pockets

I absolutely adore these Crazy Cat stamps!
They suit my very shy scaredy cat and his antics to avoid anything and everything at all cost!

Stamp the image onto the paper, and using a brush with a dab of water onto your mixed media mat, brush it over Tim Holtz Black Soot Distress Ink, and place the tip into the dab of water...colour to the darkness of black (or other colour) you might like, then use that to paint your image.

Here it is finished and putting only half a piece of matching Ranger Coredinations Forest Moss cardstock (don't be fooled by the colour in the shop..its quite green in real life) through
with the 'Pine Branch' die, it created a hidey place for this cat too

Finished off with some embellishments from 'Candy Cane Lane Decorative Buttons' to make a little banner

and some of the fabulous 'Joyous' alpha from the green sheet in the packet
(there's 6 other colour sheets too)

---------------------------------------------------------
DAY 22
Another handmade page. It doesn't take long to put these together
using blank Teresa Collins labels and Sleighbells Ring alpha sheets
(there's eight different coloured sheets in the pack)

The background paper is the reverse side of Sleighbells Ring 'Red Reindeer' Paper
(also found in the Sleighbells Ring Kit)

The 'Black Soot' cardstock is glued to the back of the patterned paper. This will become the next page for the 23rd once flipped over.
The Ranger Coredinations Forest Moss cardstock is torn and glued kind of like a side pocket wtih the photo slid somewhat into it. This gives us a plain base to do something fun.

Especially for this 'Bare Christmas Tree' Die. It has an array of little bits to put with the tree,
but I stuck with the little bows and cut quite a few along with the 'present box' which I turned into a container for the tree to stand up in! Just needs a little ink :)
The cardstock is my favourite - Tim Holtz Coredinations - Fired Brick and Pumice Stone (which is slightly more light olive than grey as shown in the product pic in shop)

Here it is decked out with its little bows.

----------------------------------------------------------
DAY 23
A 'cooking' day where each little picture says something especially when its became a tradition
And its a pretty straight forward easy page
With the use of Sleighbells Ring Washi tape that makes it look like each little photo is stuck up on a wall. The number '23' is from a great red alpha font sheet 'Let's Party' and the little alpha is from another fabulous sticker sheet 'Echo Park Season's Greetings'

---------------------------------------------------


DAY 24
Christmas Eve
Two little sleepy heads asleep in bed.... so used the reindeer names washi tape
(part of Sleigh Bells Ring Washi Tape Collection. You cant see it in the tube, but its there!)
The cardstock is Coredinations 'Antique Linen' (its more yellowy and lighter in real life)
Fabulous little black alpha - Teresa Collins, comes in a booklet

------------------------------------------------
Whoohoo!!
DAY 25!
This page is the reverse side of the pocket page above using cardstock
Coredinations 'Antique Linen' again. Enamel Shapes which includes the '25'
And the gold lettering and sentiments are Tinsel & Co Alpha & Label Stickers
(they are much 'gold-er' in real life than you see in the shop)

STILL Christmas day
(I usually have more than one page for the 25th)
This is my favourite paper from the Kit.. or you can buy it singularly 'Branches Paper
I've added a little bit of tiny pom pom trim on the edge.
(put 'trim' into the search in the shop and there is a fabulous array of trims you could use as alternatives)

This packet of word dies is fantastic!! (but sold out now - sorry but there is THIS fabulous one)
Double with sparkly glitter paper - ooh!

The alpha and sentiments are from Simple Stories

--------------------------------------------------
That's it!! All done!
To finish with...here's a side view of the album

What a joy!
----------------------------------------------
Look in the Christmas Shop HERE
and
December Daily Specials HERE
No comments:
Post a Comment